Your Guide to Creating the Perfect Tenant Welcome Letter

Table of Contents

Moving new tenants into your rental property can take a lot of work, as there are various steps you must consider before finalizing the agreement. You’ll start by identifying potential tenants and determining move-in dates, and communication with your renters is vital throughout the process. 

One way to pass essential information along is through a tenant welcome letter you send to your renters before they move into your property. This letter should be professional and positive in tone, developing guidelines and establishing a business-like relationship. 

This is about more than just welcoming them, though; it should also provide information the tenants will need on things like utilities, rent due dates, and contact information. A more substantive letter makes the transition easier for you and your tenants. This guide will explain why this is a good approach and walk you through important details to include in your letter.

a welcome letter for a tenant

Why You Should Write a Welcome Letter

You might be wondering why tenant welcome letters are necessary. The truth is that these optional communications help get the entire business relationship off on the right foot, leading to fewer problems in the future. Here are a few tips for getting them right:

  • Make Renters Feel at Home
    The letter you create can go a long way toward making your renters feel welcome. Establishing a positive relationship, even beginning with the application process, can hopefully keep any tenant issues from boiling over and becoming unproductive. You can also provide tips about the neighborhood, helping your renters adjust to living in a new part of town.
  • Set a Professional Tone
    Your letter’s tone goes a long way toward defining the relationship. Maintaining a tone that is professional, business-like, and friendly establishes clear boundaries and puts you in a position of authority. 
  • Provide Rules and Expectations
    Using your letter to outline restrictions and expectations can limit miscommunication. Putting this in a letter ensures your tenants have a physical copy of your rules, along with information on important dates, so there’s no excuse for not following them.
  • Create Repair Protocols
    The welcome letter can also let your tenants know what to do when repairs are needed. You might include contact information for a preferred contractor or, if you’d rather the tenants contact you directly with issues, your welcome letter can lay out the procedure.

There’s a variety of information you can include in your welcome letter, so prioritize the necessities and make sure they’re digestible. Tenants are less likely to read a rambling 20-page letter, so keep it concise and tell them what they need to know. 

Want to find out what your home is worth?
Get an instant market report sent straight to your inbox in seconds.

7 Pieces of Information to Include in a Tenant Welcome Letter

Writing a letter to your renters will take some time if you do it correctly. You don’t want to overlook any information your tenants need to have as they move into the building. Developing a thorough list before you begin helps ensure you lay out all the necessary information in your document, including:

1. The Next Steps

Your tenants will receive this letter before they move in, so outlining the next steps makes a lot of sense. This section might include move-in dates, when they can expect to receive the keys, rent and damage deposit due dates, and any other essential information.

2. How to Set Up the Utilities

Every building has different protocols for handling things like electricity, heat, cable, and internet. Some multiunit properties select the providers, while others allow renters to choose their own services. Providing this information for your renters can relieve a lot of confusion and ensure everything is ready for them on move-in day.

3. Garbage Collection

Your tenants will need notice regarding garbage collection day. Your letter should include a message on where they take their garbage, how much they’re allowed to dispose of, and details on recycling if it’s available. You might direct your renters to your city’s website if it has more information.

4. Parking Information

Parking information probably isn’t necessary if the rental home has a private driveway. Apartment buildings and condos often have strict parking regulations that your renters must learn, however. You may also need to provide parking passes.

5. Renters Insurance Reminder

There is no federal law requiring tenants to carry rental insurance. You can put a clause in the lease, though, making it a requirement. Including a reminder regarding rental insurance makes it less likely that your tenants will forget to buy it, helping protect their belongings and your property from liability issues.

6. Reporting Maintenance Issues

Include a clear set of protocols for reporting maintenance issues. Apartment buildings might have maintenance personnel available at all times, so you’ll want to include their contact information in your letter. It’s also a good idea to have your renters talk to you anytime there’s an issue so you can make a note of it.

7. Walk-Through Reminders

Landlords should make periodic walk-throughs of a rental property to ensure everything is in order. You might do your first walk-through soon after your tenants move in, so include a reminder in your welcome letter. You might also send notice of future visits you plan to make or provide some basic timelines.

Your tenant welcome letter can get this important relationship off to a good start and set expectations on both sides. It’s a good idea to figure out what’s essential and what you can go over with your renters later to avoid providing too much data at once.

Contact an Expert for Property Management Assistance

Writing a tenant welcome letter can be an overwhelming experience because there’s so much information you’ll want to provide. Anyone unsure where to start should consider hiring a property management firm to secure quality tenants and manage your paperwork throughout the process.

Nomadic Real Estate offers unparalleled property management services in the Washington, D.C., area. Our skilled real estate pros can assist with every aspect of securing new tenants for your rental property, including coordinating the logistics of your tenants’ move-in. Reach out and contact us today to speak with a property management expert.

Share via Email
Share on Facebook
Share on LinkedIn
Share on Twitter
Get help from DC's top real estate team.
Founded in 2005, Nomadic is the go-to full service real estate firm in the DMV. We've helped thousands of landlords, investors, and residents and we would love to connect with you next.
Scroll to Top

Thinking of selling? Get an instant property value report:

Enhanced Reporting

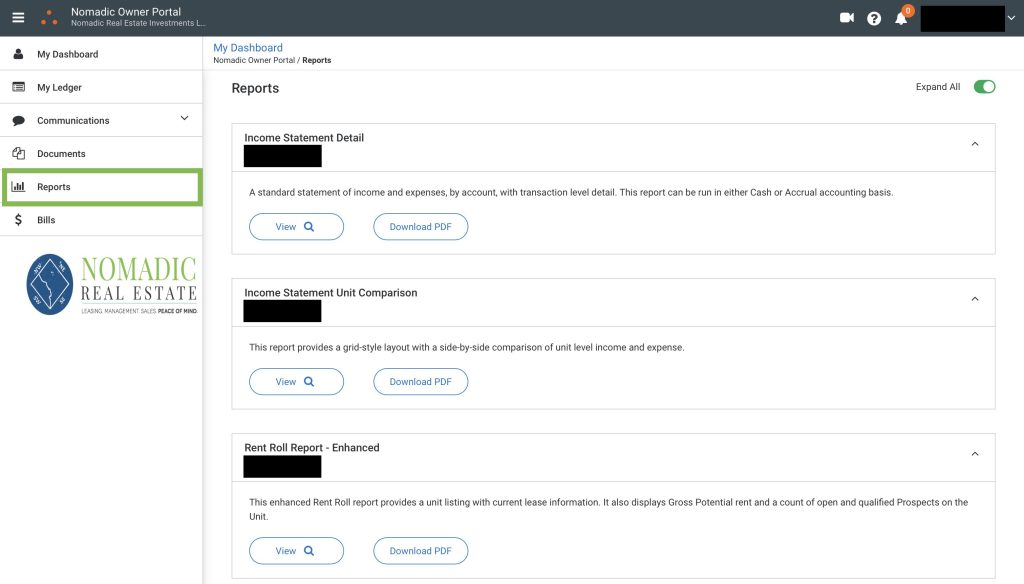
Your portal includes a selection of extremely useful reports. Reports are available in the “Reports” section, and are distinct from the financial statements. Unlike financial statements which are static records, Reports are dynamic real-time records that will update with current data every time you view them. 

Scroll down to learn more about Reports:

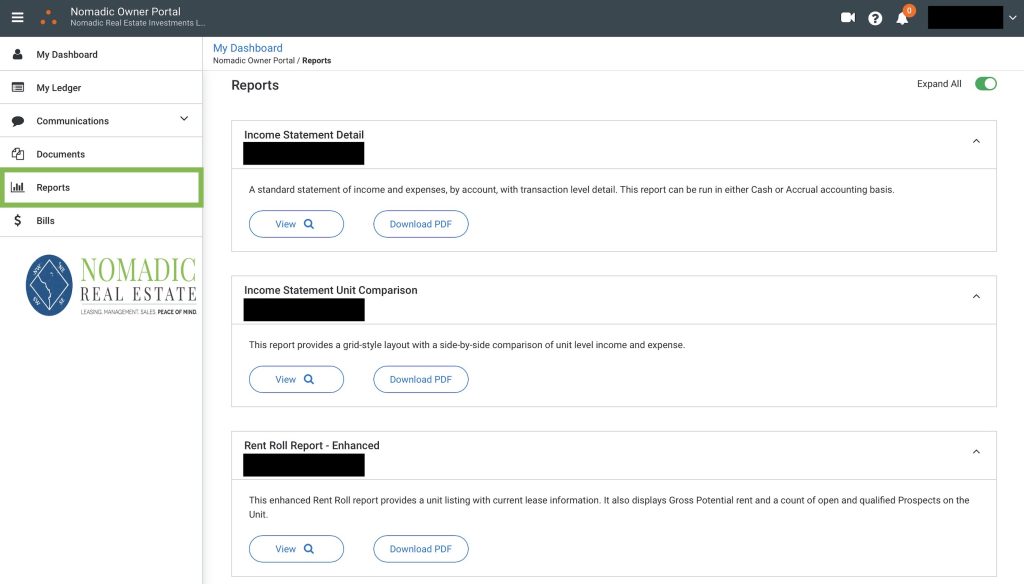
Navigate to the "Reports" module in your portal:

Owner Portal Reports
  • Keep in mind, these reports are dynamic records. They will refresh to display current information every time you view them. 

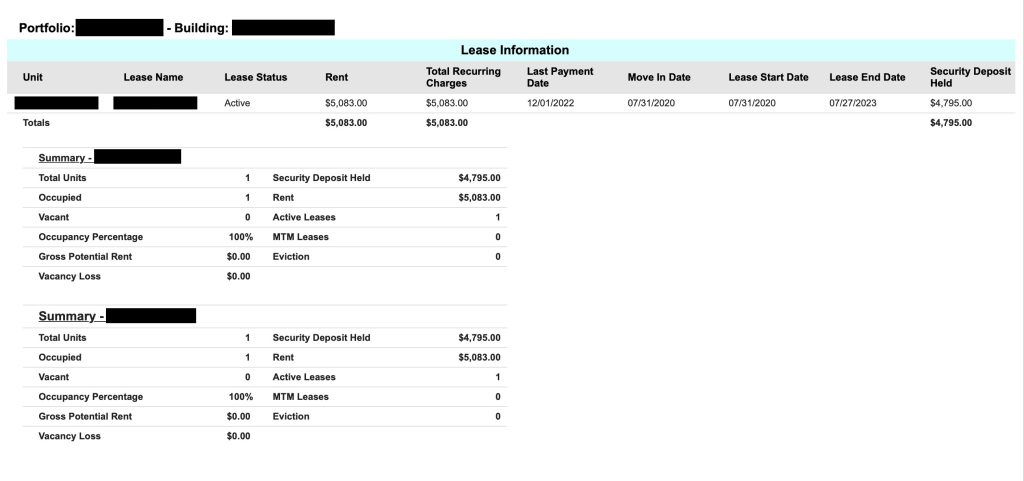
Enhanced Rent Roll Report:

Enhanced Rent Roll Report
  • The Enhanced Rent Roll Report will show the rent amount, last payment date, move-in date, lease expiration date, and security deposit amount for each of your tenants. 
  • It will also show a portfolio summary with occupancy percentage, vacancy loss, and more!

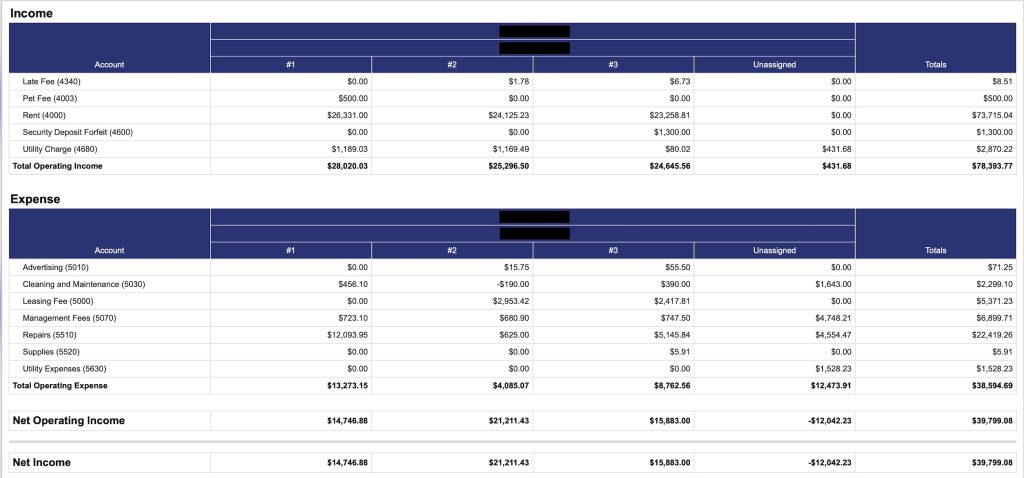
Unit Comparison Report:

Unit Comparison Report
  • If you own multiple units (or buildings) with Nomadic, you’ll get access to the Unit Comparison Report. 
  • This report enables you to quickly compare financial performance between your units at a glance without toggling between individual reports. 

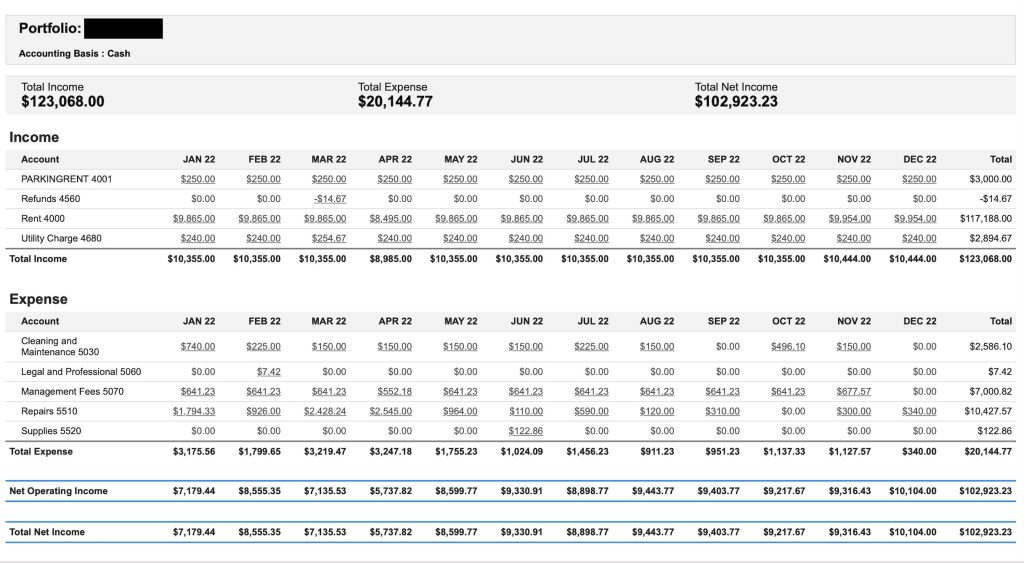
Income Statement Month-Over-Month:

Income Statement by Month Report
  • The Income Statement Detail – Monthly Report serves as a month-over-month record of portfolio performance. You’ll see itemized income and expense categories and can track monthly. This report will update with fresh data every time you view it. 

Financial Statements

Financial statements will be published to your portal on a monthly basis. The statements are found in your Documents library, and provide a historical record of all financial performance. The statements serve as a snapshot of financial performance over a given period, and are static documents (unlike Reports, the statements do not update/change in real-time). 

Scroll down for more info about the Financial Statements in your Documents library:

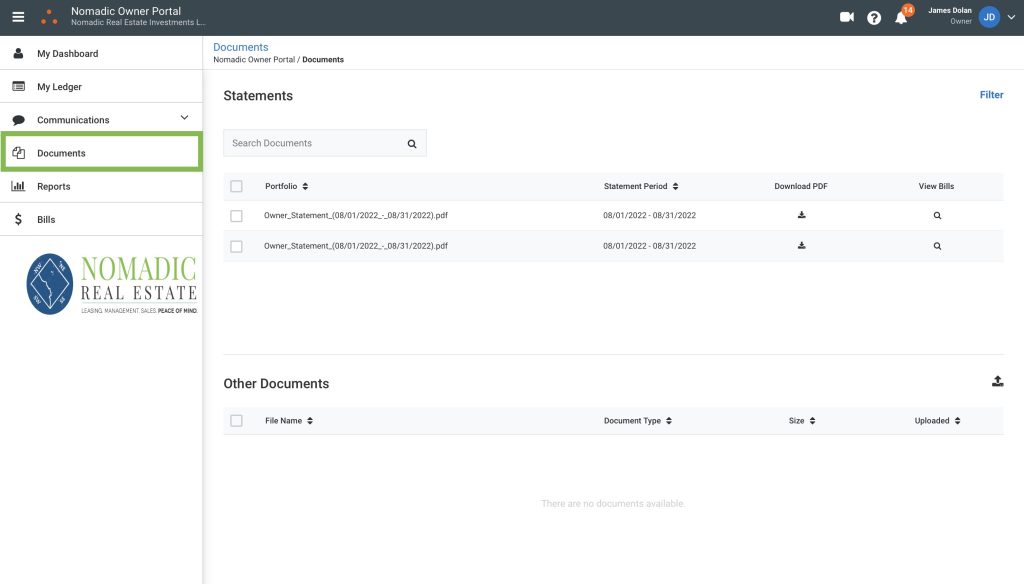
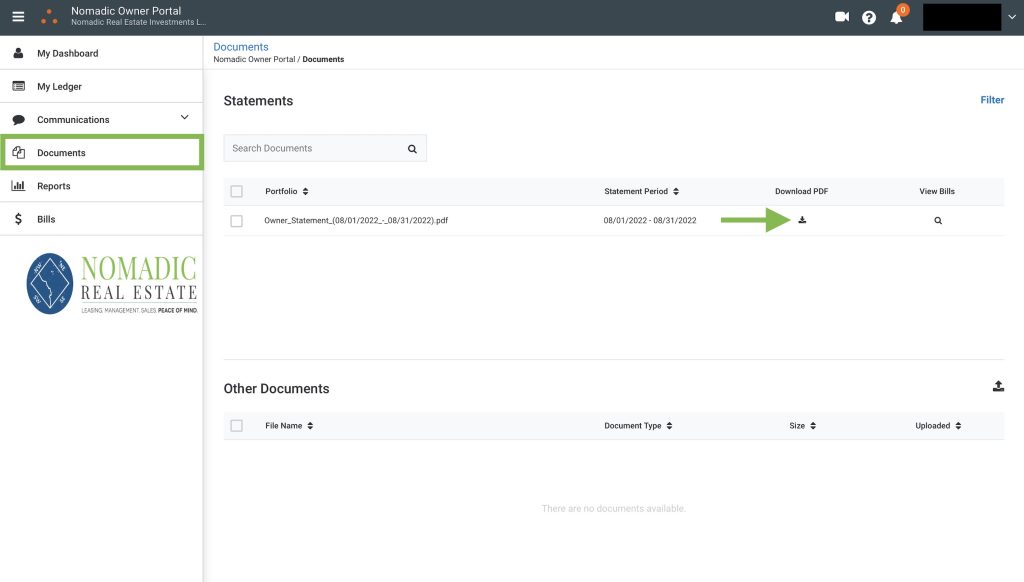
The Documents area contains monthly financial statements:

Owner Portal Documents
  • The statements in the Documents are are static documents. They are posted to the portal once a month to serve as a historical record of financial performance. 

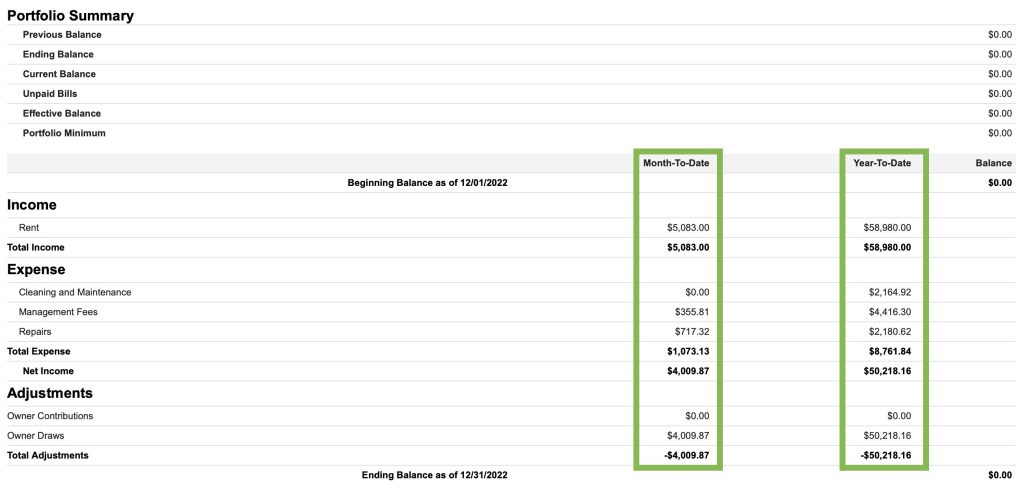
Download a statement to see month and YTD financials:

Owner Portal Property Statement

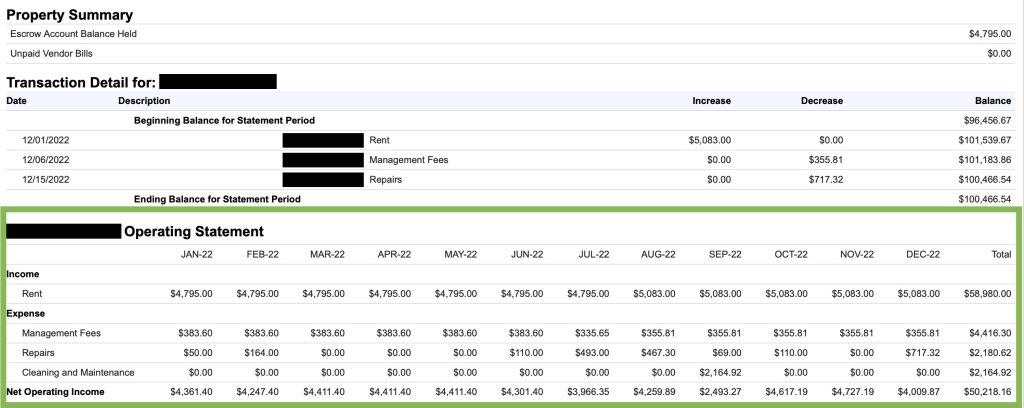
You'll also find a month-over-month operating statement:

Month over Month Statement

Portal Communication Tool

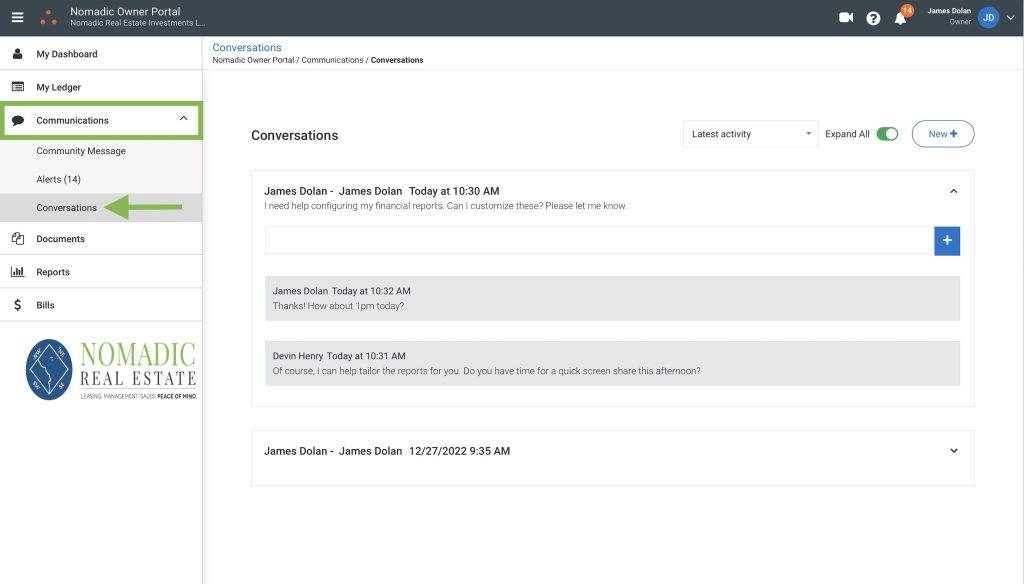
You can use your owner portal to communicate with our team. Any messages you send through the portal will go straight to your Account Manager. When we reply, you’ll get an email notification and you’ll also see the message in your portal next time you log in. 

Here’s an overview of using the communication platform:

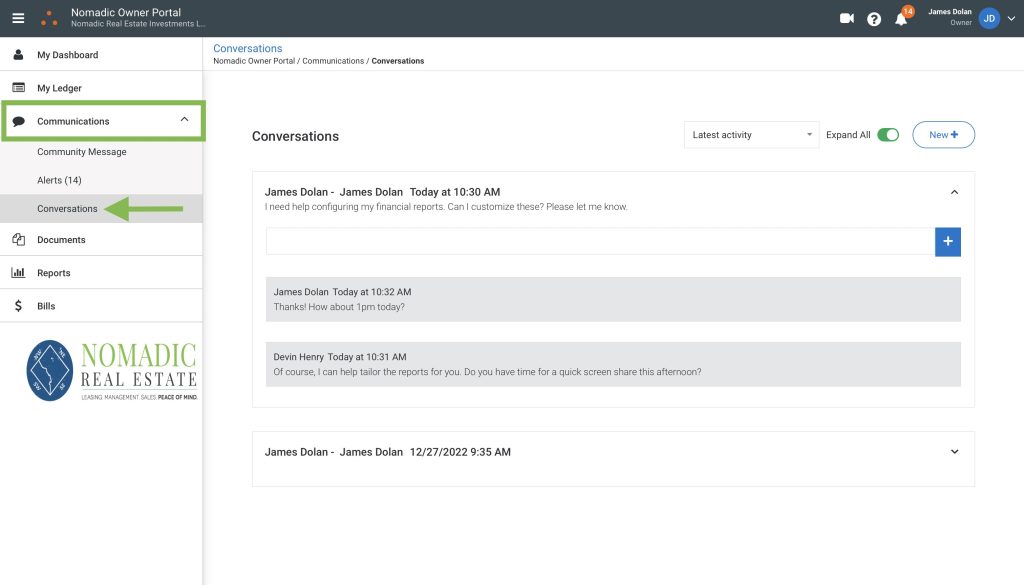
Click "Communications" and navigate to "Conversations":

Commincation Dashboard Screenshot
  • The communications module will contain a record of all messages that you create through the portal. 

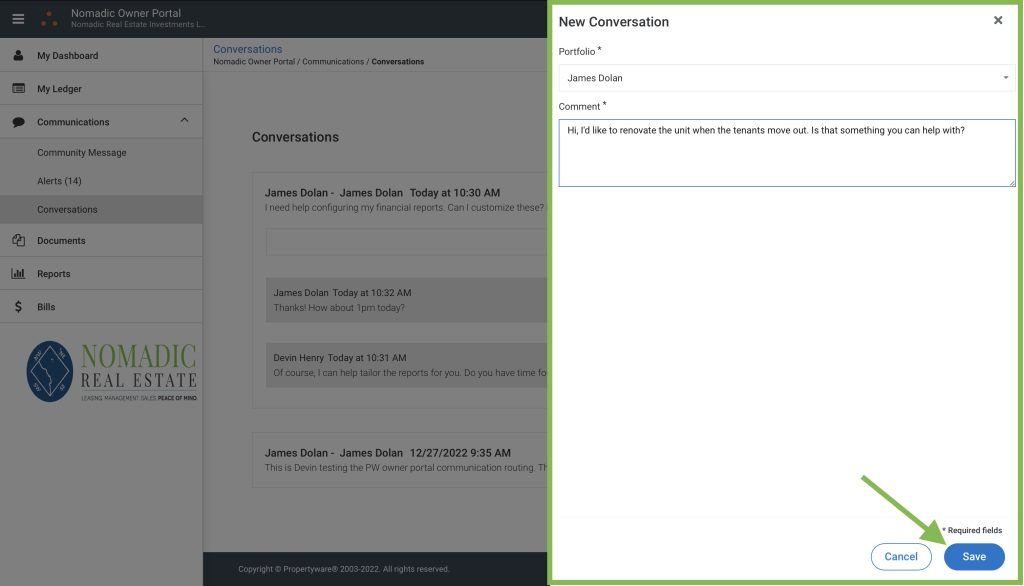
Click the "New Message" button and send your message:

Owner Portal New Message Screenshot

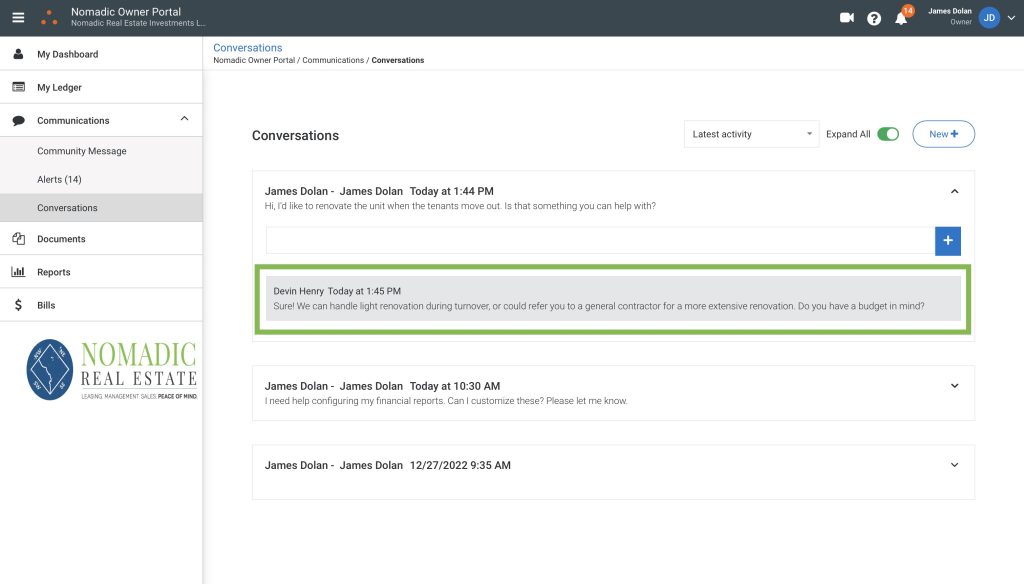
Responses will show up in the conversation ticket:

Portal Conversation Response Screenshot
  • You’ll get an email notification whenever you get a response, and you’ll also see the message in your portal next time you log in. 

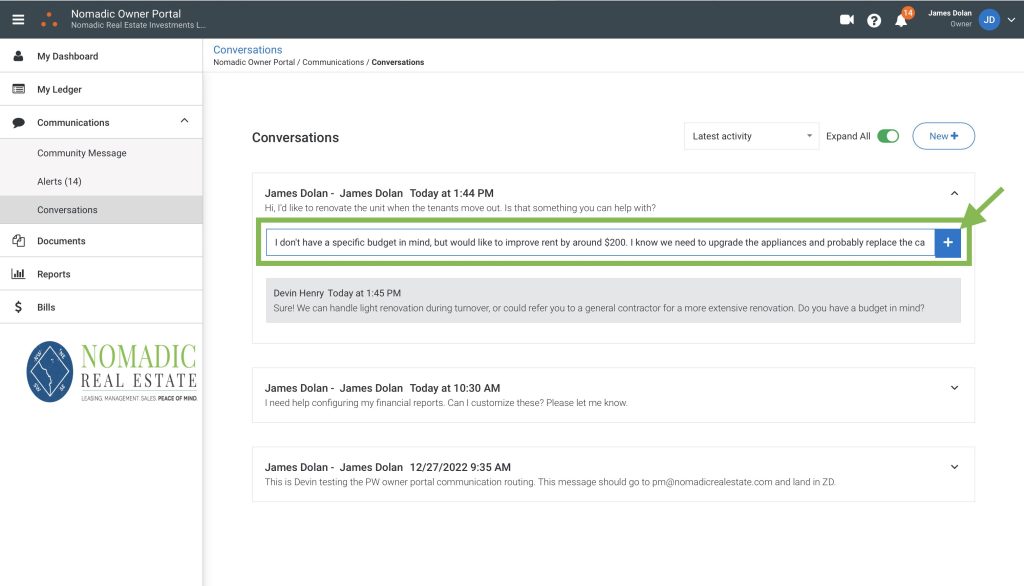
You can reply in-line using the comment box:

Owner Portal Comment

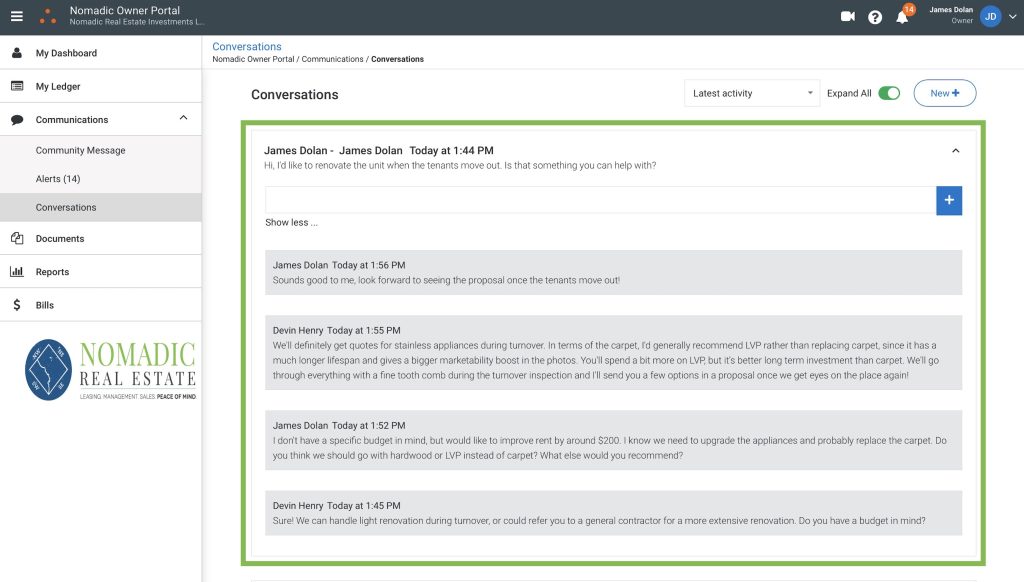
Each conversation will be logged in its entirety:

Portal Conversation Snapshot

Understanding the Ledger

Your portal includes a ledger with all transactions. The ledger is populated with data in real-time as transactions flow through our accounting software. Much of this information is also available in the Reports area, as well as the Statements in your Documents library, but the ledger is the most comprehensive resource for diving into the details. 

Please scroll through the sections below to get a better understanding of how to interpret the ledger. 

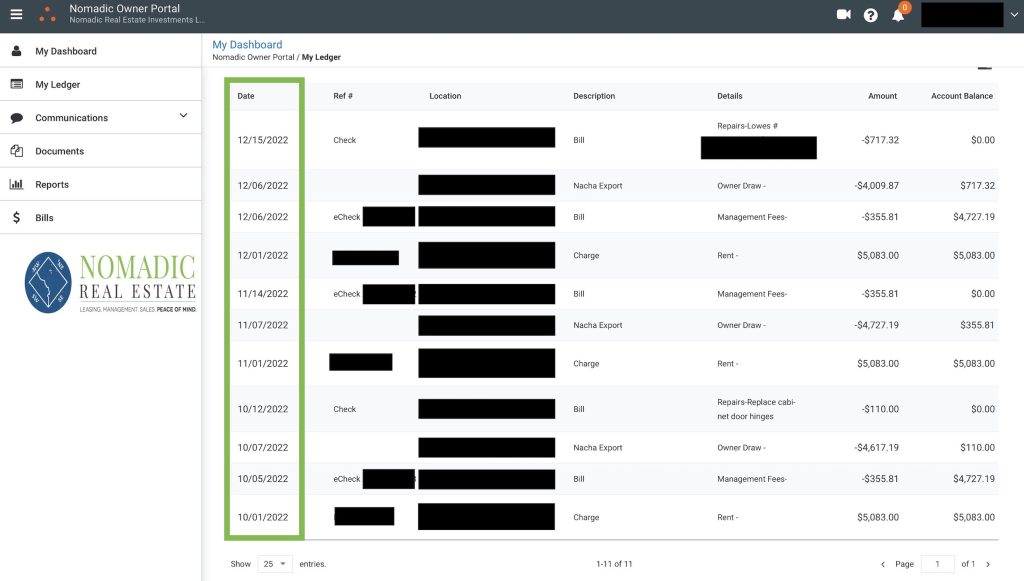
By default, transactions are sorted chronologically:

Owner Ledger Dates
  • The date reflected in the lefthand column is the actual transaction date, not the “bill date”. This is the date the transaction was actually processed. 

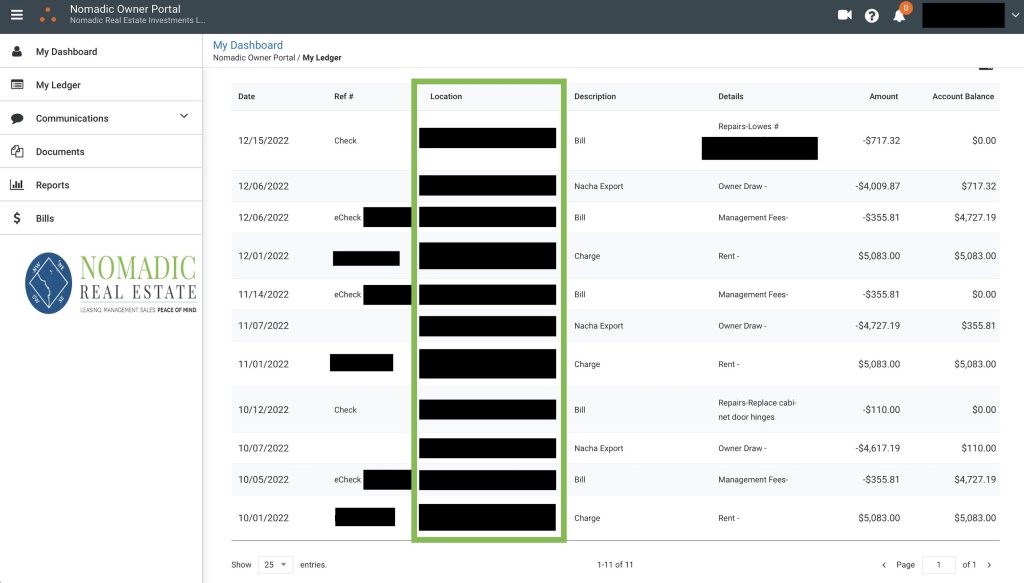
If you have multiple properties with Nomadic, you'll see the address for each transaction in the "Location" column:

Ledger Property Column
  • You can filter the ledger to look at just one property, all properties, or specific sets of properties. 
  • If you only have one property with us, you’ll just see the ledger for that property. 

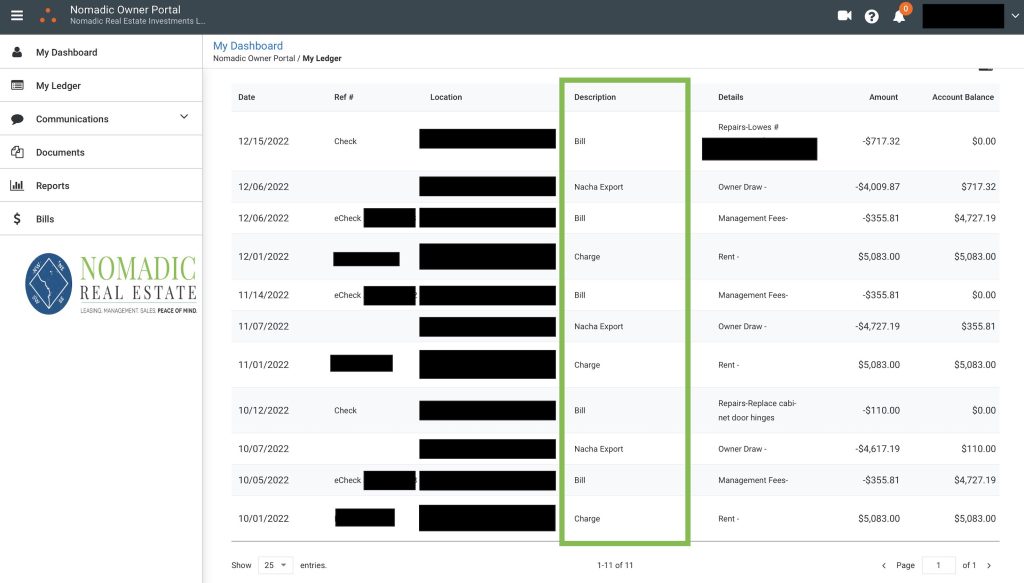
The Description column displays the transaction type:

Owner Ledger Description Column
  • BILL: this is an expense transaction, such as for repair costs or management fees.
  • CHARGE: this is a transaction  billed to the tenant, most typically a rent payment. 
  • NACHA EXPORT: this is a credit we processed to your distribution account. This type of transaction is how you get paid! 

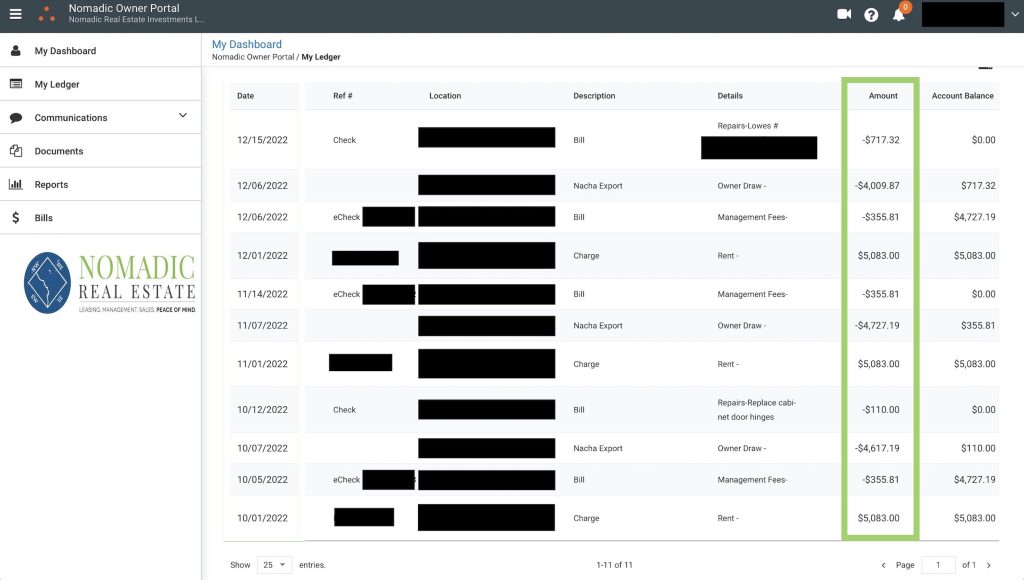
The Amount column shows the dollar value of each transaction:

Owner Ledger Amount Column
  • Positive Amounts: if an amount is positive, it reflects a transaction that is payable to you. Typically, this will be a rent payment that we collected from your tenants. On occasion, a positive number could also signify a journal entry or credit adjustment. 
  • Negative Amounts:  if an amount is negative, this is a transaction that is either payable to Nomadic or is an amount that has already been paid to you. Typically this will be for repair costs or management/leasing fees. Owner draws (net distributions into your checking/savings account) also reflect as negative amounts, since they have already been paid to you. 

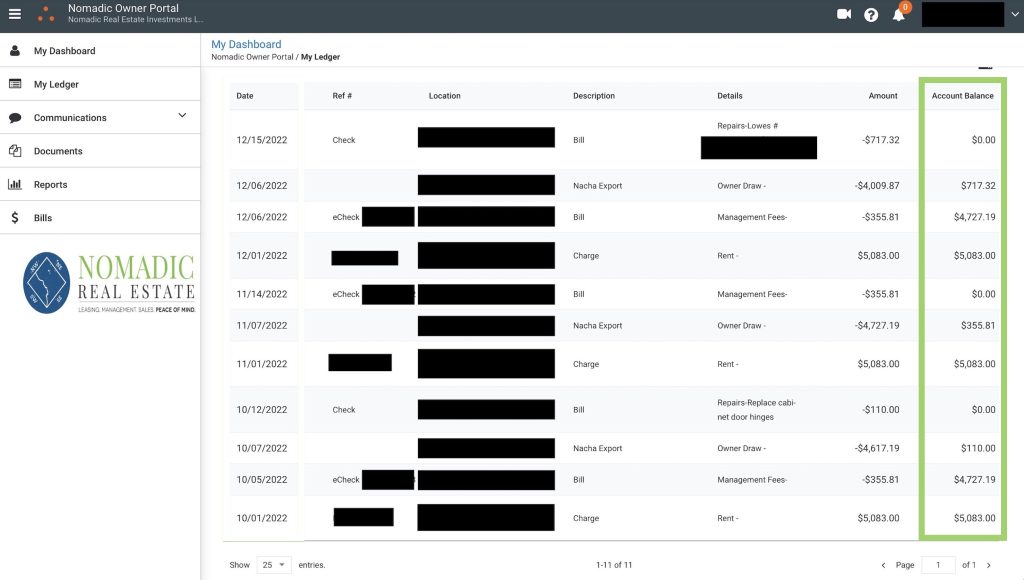
The Account Balance column shows a sum of positive/negative transactions at a given point in time:

Owner Ledger Account Balance Column
  • Account Balance should always equal zero after a net distribution has been processed. When the balance is zero, this means that all expenses have been paid and you’ve received the remainder as net operating income, leaving a balance of zero (meaning: no one is due any money, as all funds have been distributed appropriately). 

Navigating the Propertyware Owner Portal

Your portal includes some extremely useful features that help you understand your property’s financial performance at a new level, with real-time transparency into every transaction.

Scroll through the snapshots below for an overview of portal navigation! If you need more help or have specific questions about using the portal, you can reach out to your Account Manager any time for a screen share. 

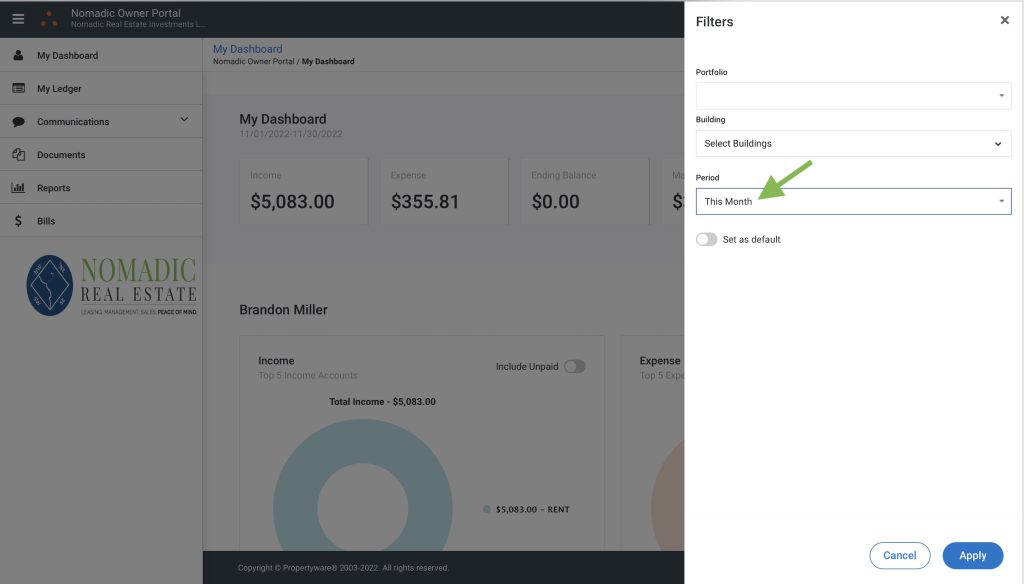
You can filter all info by date range or property:

PW Portal Filters

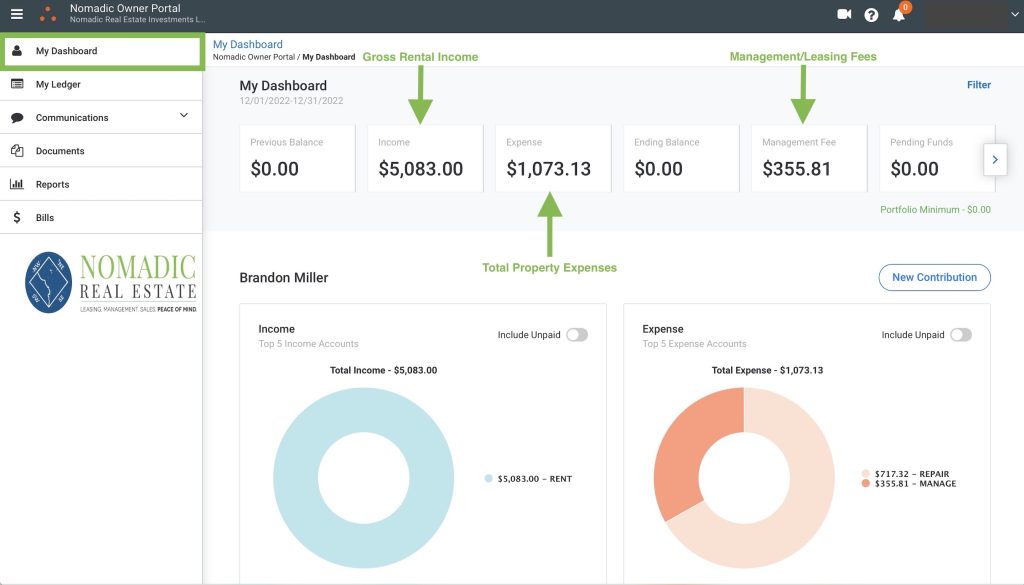
View a snapshot of income and expenses on your dashboard:

PW Owner Dashboard View

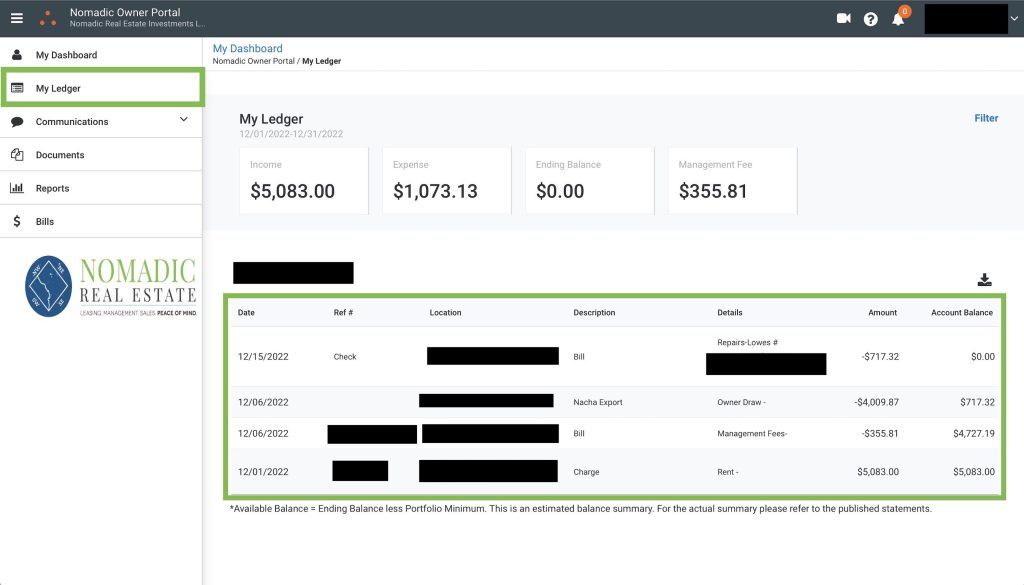
See every transaction in real-time on your ledger:

Owner Portal Ledger View

Statements and forms will be posted to your documents library:

Owner Portal Document Library

View a suite of real-time financial reports:

Portal Reports View

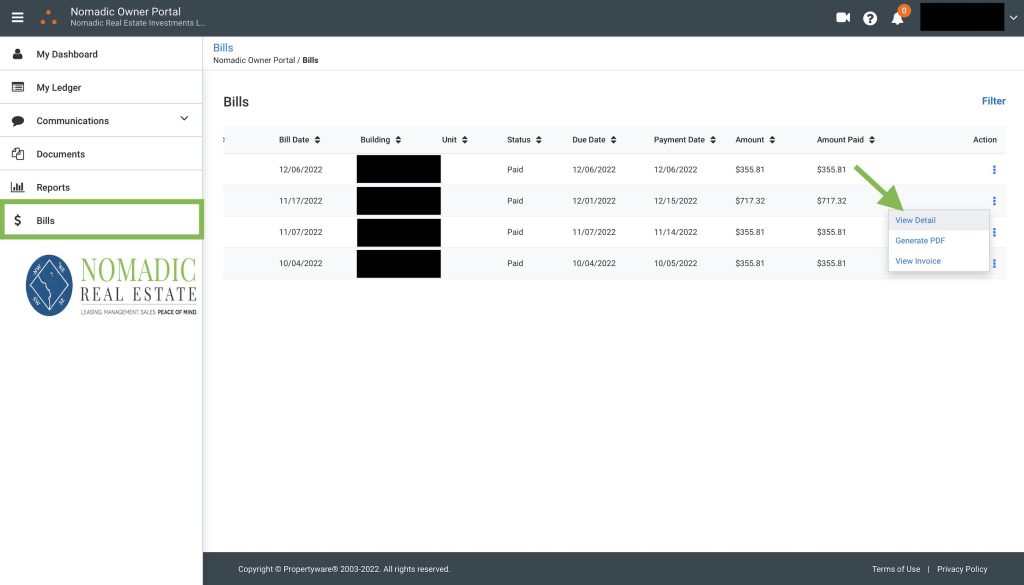
See a running list of all bills, and drill down for more detail:

Owner Portal Bills View

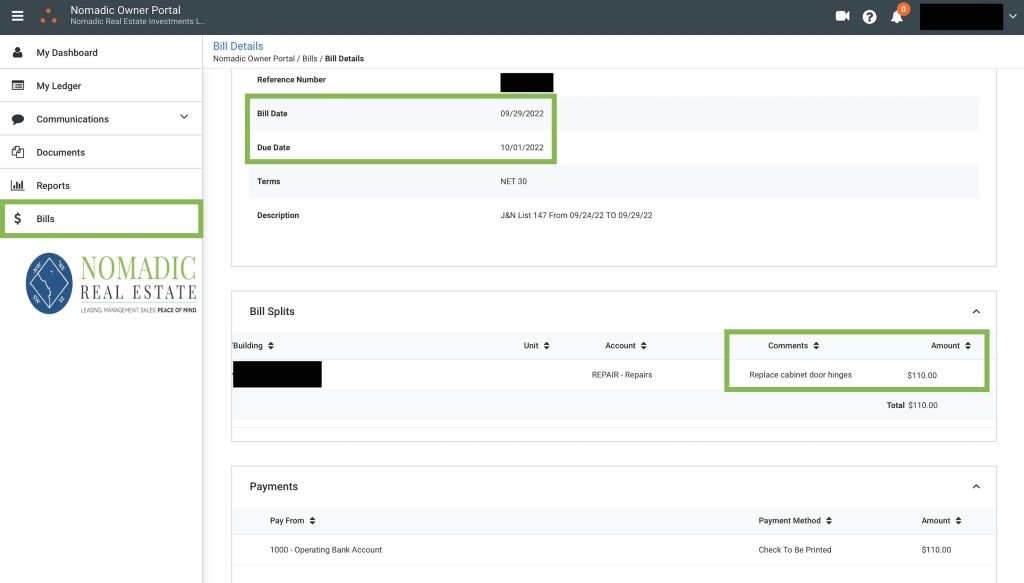
Under Bill Details, you'll find dates/descriptions/amounts and more:

Portal Bill Details

You can also communicate with your Account Manager through the portal:

Owner Portal Communication Tools

How do net distributions work?

Net distributions keep your accounting clean and simple. Each month we’ll collect rent from the tenants, deduct any repair expenses for the previous month and any management/leasing fees for the current month, and credit the remaining net operating income to your account. 

Net Distribution

You’ll receive a statement via email each time a net distribution is processed, and can view all transaction details in your Propertyware owner portal.